Please use the following jump links to navigate to specific projects:
Automate w/ AWS Lambda — Shutdown EC2 Instances Daily
SSO Configuration for AWS (with JumpCloud IDP!)
Disclaimer
- While I strive to ensure the accuracy of the information I provide, I make no guarantee as to the accuracy, correctness, nor do I accept any liability for loss or damage (monetary or other), which may be incurred by any person or organization from reliance on or use of information on this site.
- The contents of this article should not be construed as legal advice.
- Opinions are my own and not the views of my employer.
- If you have any queries or if you believe any information in this article is inaccurate, or if you think any of the assets used in this article are in violation of copyright, please contact me and let me know.
Serverless Web App
In this post I will walk you through how I created a new serverless web app. Here we will be leveraging S3 for static website, Rest API gateway. Lambda, SQS, DynamoDB, DynamoDB Streams, S3 as a data lake, CloudTrail, EventBridge, and SNS Topic. The end result will look like this:
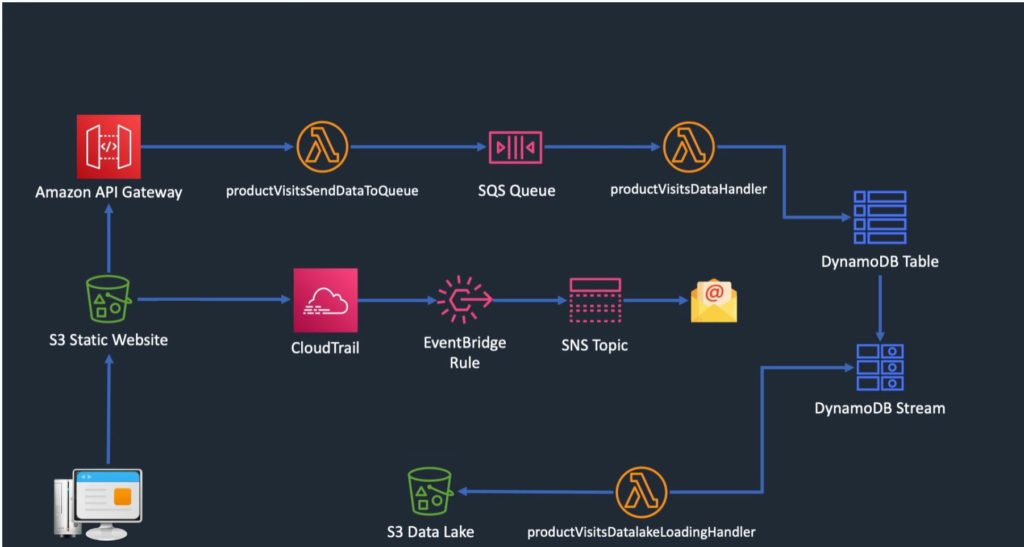
The purpose of the web app is to create a page with an API call and Lambda function that will allow a user to enter product information into a database.
1. Create a DynamoDB table. This part is very easy, DynamoDB doesn’t require much configuration at all. I simply name the table, name the partition key, and leave the partition key as a string. To cut down on costs I have set my DDB table RCU/WCU at 1/second.
2. Create an SQS queue. SQS is also very simple to configure for this use case. I give it a name, leave the visibility timeout, message retention period, etc. to be default. I only need a basic access policy, and this will be a Standard queue, we have no need for FIFO.
3. Create Lambda function to send data to SQS queue. Here I will have to begin using some code to get what I want. I first choose to Author from Scratch, name the function, select Node.js 12.x, and create a new execution role. We can use AWS policy templates here for convenience. We will add “simple microservice permissions” and “SQS poller permissions”. These policies allow Lambda to write to DynamoDB and poll SQS. Now I upload the .zip file with my code in it. Finally, I create a Lambda function trigger (within SQS configs) so that SQS will notify Lambda whenever a message arrives in the queue.
4. At this point I use the AWS CLI to manually push some test messages straight to the SQS queue to see if it ends up in my DynamoDB table.
5. My fifth step is to enable DynamoDB streams so I can have a record of item-level changes in the table. Its as simple as clicking Enable Streams and then New Image.
6. I now create an S3 bucket to use as a data lake. Then go to IAM and create a policy for Lambda. I am going to create yet another Lambda function which will be used to load data into the S3 data lake. The policy will look something like this:
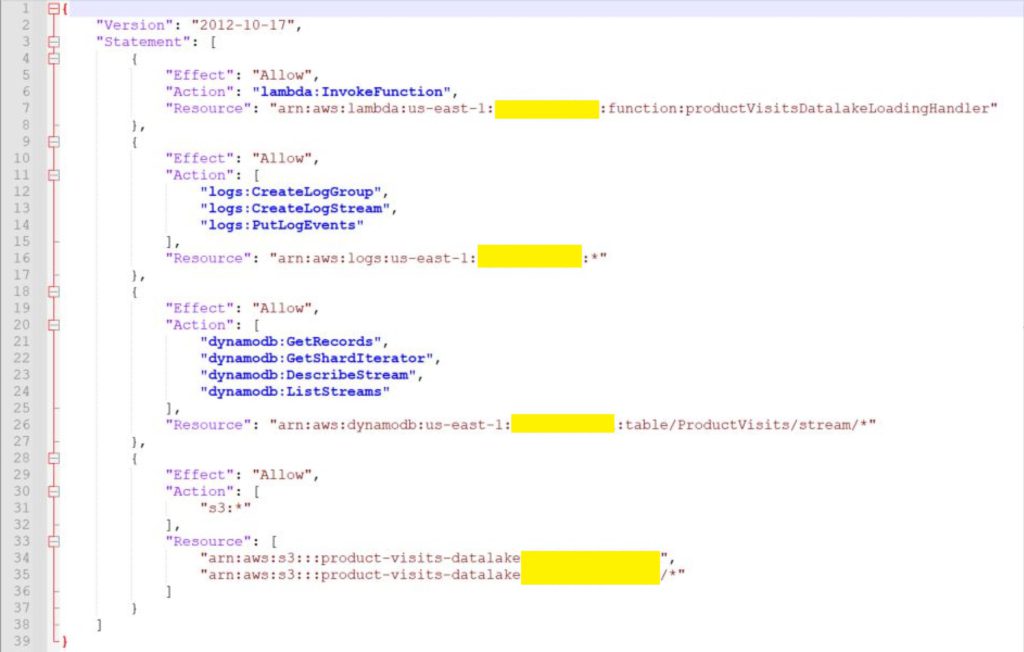
7. I also now create a role in which to attach this policy. And then name and create our third function and upload the .zip with my code. Then I configure DynamoDB with a trigger to invoke the datalake Lambda function.
8. Again, I use the AWS CLI to send some test messages and confirm everything is triggered and runs properly.
9. Now I am backtracking to our frontend, where I still need to create a S3 static website and an API gateway. For API gateway, I just need to select Rest API, name it, specify the endpoint type (regional), give it a resource name and path, and create a PUT method. I am going to use Lambda Proxy integration because I want to send data straight to Lambda without any modification. Lastly, I deploy the API to “dev” stage.
10. Back on S3 I make a bucket for my static website, enable public access, and enable CORS. Lastly I use the AWS CLI command to sync my static website files to the S3 bucket. “aws s3 sync ./frontend <directory path>” should do the trick.
11. By now the app is actually working, the only remaining (optional) steps are to enable Cloudtrail for management-level logging, and use EventBridge+ SNS to get email alerts if any of my configs change.
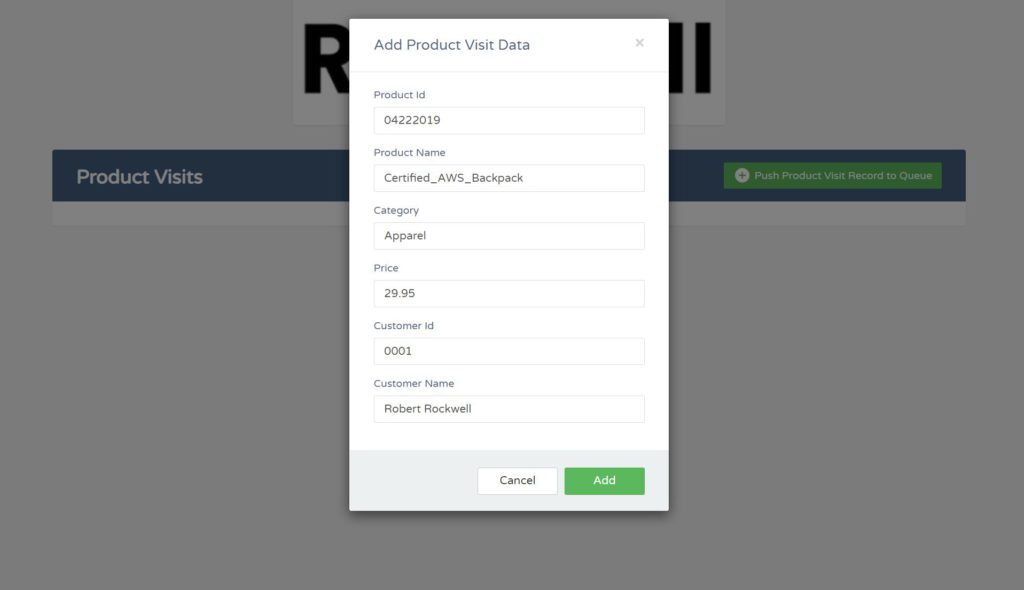
12. The link to my static webpage is: http://product-visits-webform-digitalcloud123.s3-website-us-east-1.amazonaws.com/. Feel free to try it yourself. Unfortunately, you won’t be able to access my DynamoDB table to see your data get entered, but the following screenshots show that my web app is definitely working.


So that’s it! I hope you enjoyed this project as much as I did. Thanks for taking with me at a small example of how these AWS services can integrate.
Web Form (Amplify)
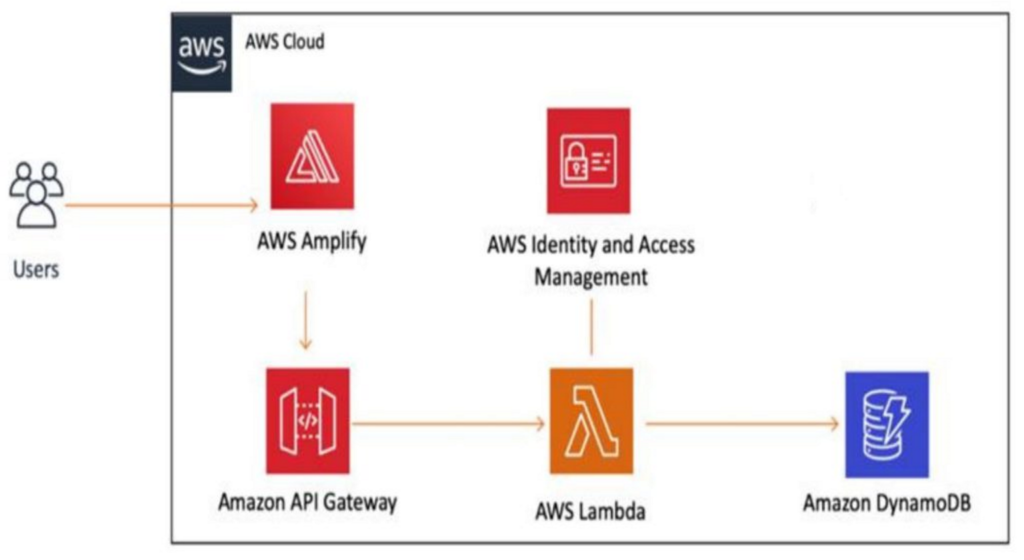
The goal of this project is to demonstrate how easy it is to deploy a web form in minutes using AWS. All I am doing is taking a first and last name and echoing it back using Lambda, whilst writing the values to DynamoDB. Here is a brief description of the AWS services are leveraged and for context, how I am using it in my particular case:
Amplify – Amplify’s open source framework includes a set of libraries, UI components, and a command line interface (CLI) to build an app backend and integrate it with your iOS, Android, Web, and React Native apps. The framework leverages a core set of AWS Cloud Services to offer capabilities including offline data, authentication, analytics, push notifications, and bots at high scale. Here I am using it in a very basic capacity to host a separate page for my app.
API Gateway – Amazon API Gateway is a fully managed service that makes it easy for developers to create, publish, maintain, monitor, and secure APIs at any scale. APIs act as the “front door” for applications to access data, business logic, or functionality from your backend services. Here I am using rest API to receive HTTP Post requests and pass them to Lambda for processing.
Lambda – AWS Lambda is a serverless compute service that lets you run code without provisioning or managing servers, creating workload-aware cluster scaling logic, maintaining event integrations, or managing runtimes. With Lambda, you can run code for virtually any type of application or backend service – all with zero administration. Just upload your code as a ZIP file or container image, and Lambda automatically and precisely allocates compute execution power and runs your code based on the incoming request or event, for any scale of traffic. The purpose of Lambda here is to collect information entered into the forms and copy them into DynamoDB.
DynamoDB – Amazon DynamoDB is a key-value and document database that delivers single-digit millisecond performance at any scale. It’s a fully managed, multi-region, multi-active, durable database with built-in security, backup and restore, and in-memory caching for internet-scale applications. DynamoDB can handle more than 10 trillion requests per day and can support peaks of more than 20 million requests per second. The reason I chose DynamoDB for this project is because a schema-less, unstructured database works for my needs here and it is a very cost-effective option.
Please see the below flow chart to understand how these services are integrated.
Finally, I am happy to present the finished product of this project. Please click the following link, and feel free to enter your first and last name, then the Call API button. The data will be entered into my DynamoDB database. Kind of like you are signing my guestbook! The API Gateway has been secured against excessive use by throttling the requests per second and limiting to 100 requests per day. To illustrate how cost-effective AWS can be, this solution is costing me $1 per month.
Web Form (REST API + Lambda)
For this project I wanted to take advantage of a simple website stored in an S3 bucket, which includes a webform. The idea is similar to my last two projects, but I wanted to simplify things as much as possible to show how quickly and easily we can set it up. On top of that, the information entered can be viewed by the end-user, so anyone is welcome to test out this project.
We can start by creating the S3 bucket and creating the web form. The HTML below of course needs to be used as the index.html file within the bucket. I’ve made the bucket with public read-access.
<!DOCTYPE html>
<html lang="en">
<head>
    <script>
        function submitToAPI(e) {
               e.preventDefault();

               var favfood = document.getElementById("favfood-input").value;
               var favdrink = document.getElementById("favdrink-input").value;
               var favcity = document.getElementById("favcity-input").value;
               var favmovie = document.getElementById("favmovie-input").value;

               var data = {
                  favfood : favfood,
                  favdrink : favdrink,
                  favcity : favcity,
                  favmovie : favmovie
                };

                var xmlhttp = new XMLHttpRequest();
                xmlhttp.open("POST", "https://9g7j07r97f.execute-api.us-west-2.amazonaws.com/dev/userfavs");
                xmlhttp.setRequestHeader("Content-Type", "application/json");
                // xmlhttp.setRequestHeader("Access-Control-Allow-Origin", "*");
                xmlhttp.send(JSON.stringify(data));
                xmlhttp.onreadystatechange = function() {
                if (xmlhttp.readyState === 4) {
                  console.log(xmlhttp)
                    // var response = JSON.parse(xmlhttp.responseText);
                    if (xmlhttp.status === 200 ) {
                        // console.log('successful');
                        // enable this again if debug is needed.
                        document.getElementById("webform").innerHTML = "<h1>Thank you for trying my webform! Click below to download a CSV proving this works!</h1> <a href='https://userfavorites.s3.us-west-2.amazonaws.com/user_fav_results.csv'>CLICK FOR RESULTS</a>";
                    } else {
                        console.log('failed');
                    }
                }
            }

            document.getElementById('webform').reset();

            }
        </script>
        </head>
        <body>
        <form id="webform" method="post">
              <h4>Favorite Food:</h4>
              <input type="text" style="height:35px;" id="favfood-input" placeholder="Enter food here..." class="form-control" style="width:100%;" /><br/>
              <h4>Favorite Drink:</h4>
              <input type="text" style="height:35px;" id="favdrink-input" placeholder="Enter drink here..." class="form-control" style="width:100%;"/><br/>
              <h4>Favorite City:</h4>
              <input type="text" style="height:35px;" id="favcity-input" placeholder="Enter city here..." class="form-control" style="width:100%;"/><br/>
              <h4>Favorite Movie:</h4>
              <input type="text" style="height:35px;" id="favmovie-input" placeholder="Enter movie here..." class="form-control" style="width:100%;"/><br/>
              <button type="button" onClick="submitToAPI(event)" class="btn btn-lg" style="margin-top:20px;">Submit</button>
        </form>

        </body>
</html>
I’ll create the Lambda function next because the REST API will need to point to that.
import json
import boto3
import csv


# lambda function
def lambda_handler(event, context):
    # TODO implement


    favfood = event["favfood"]
    favdrink = event["favdrink"]
    favcity = event["favcity"]
    favmovie = event["favmovie"]


    f = open("/tmp/lambdatemp.csv", "w+")
    temp_csv_file = csv.writer(f)
    # writing the column names
    temp_csv_file.writerow(["Favorite Food", "Favorite Drink", "Favorite City", "Favorite Movie"])
    temp_csv_file.writerow([favfood, favdrink, favcity, favmovie])
    f.close()

    client = boto3.client('s3')
    client.upload_file('/tmp/lambdatemp.csv', 'userfavorites','user_fav_results.csv')


    mybucket = 'userfavorites'
    mykey = 'user_fav_results.csv'
    response = client.put_object_acl(
        ACL="public-read", Bucket=mybucket, Key=mykey
    )


    # conn = boto.s3.connect_to_region('us-west-2')
    # bucket = conn.get_bucket('userfavorites')
    # key = bucket.lookup('user_fav_results.csv')
    # key.set_acl('public-read')


# # writing rows in to the CSV file
# for detail in response:
#     temp_csv_file.writerow([detail['account_name'],
#                             detail['month'],
#                             detail['cost']
#                             ])

    return {
        'statusCode': 200,
        'message': 'success!!'
    }
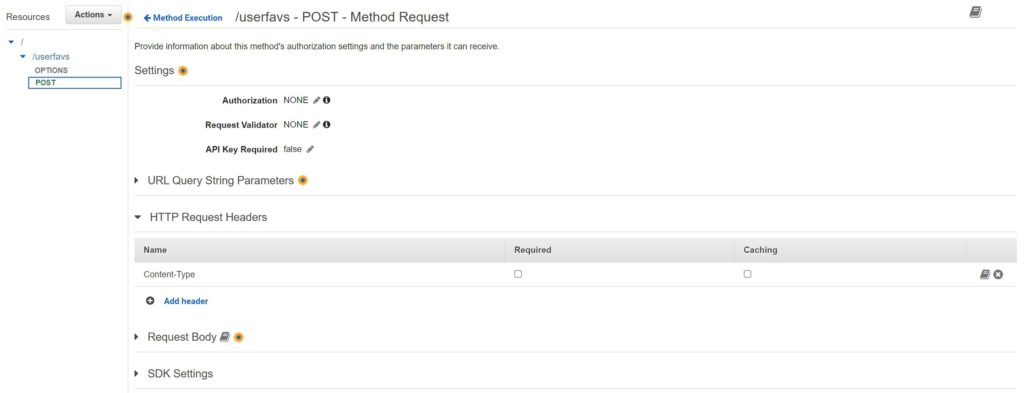
Last I will create the REST API. Please see the screenshots below for the configs:
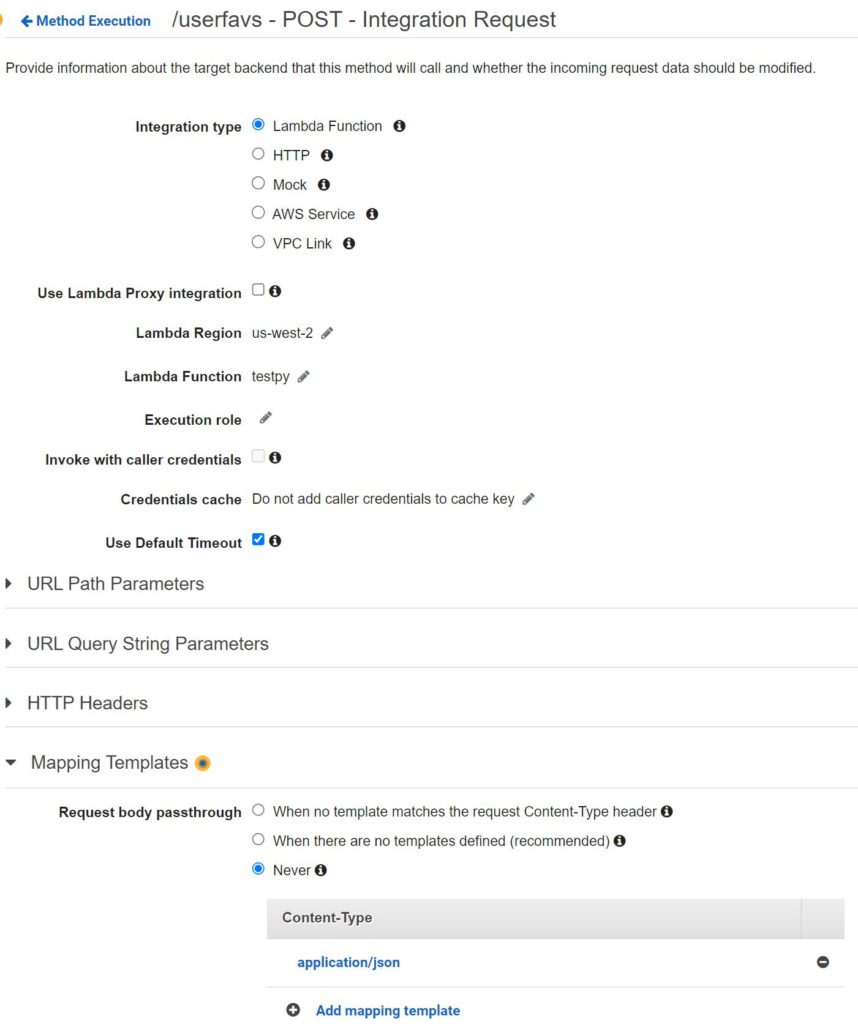
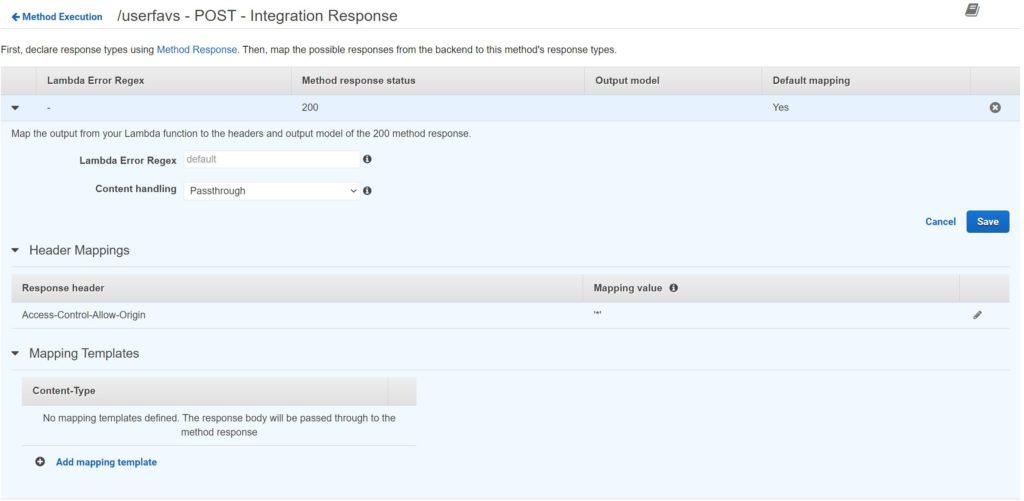
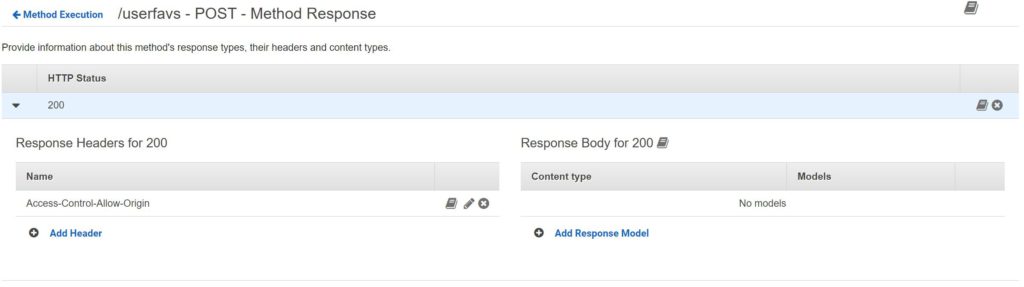
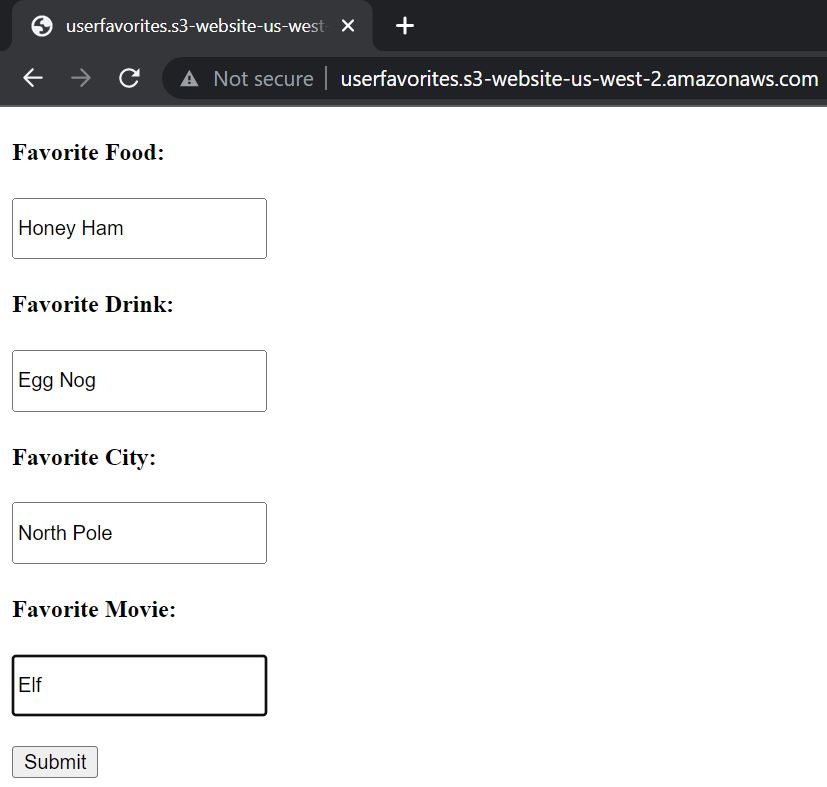
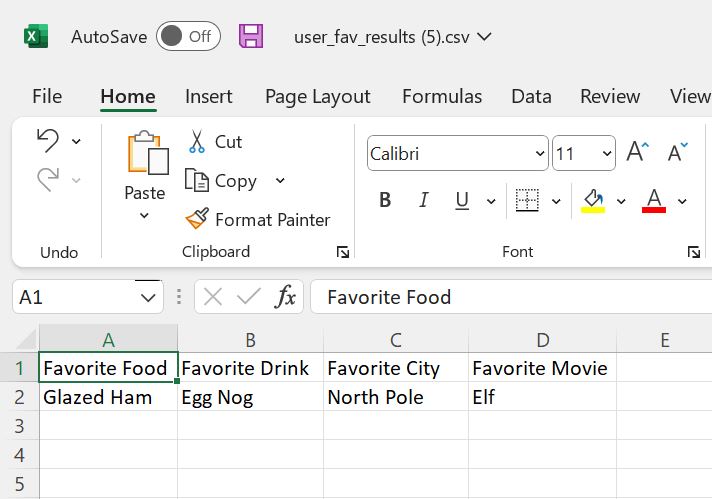
Not pictured above, I also enabled CORS. So that is pretty much it. We have the website in S3 to present web form to the user, and the web form points to our REST API. Our API will receive the data and pass it to Lambda which can perform the actual operations. In this case, Lambda is configured to simply overwrite the existing csv with a new one using the data provided (appending is trickier, and this way the user doesn’t see everyone else’s responses and have to scroll through them to find their own). The Lambda will put the new file in the same bucket as the index file and the webform includes a link to the csv after the form is submitted. Please see an example below:
Webform:
Webform Prompt Post-Submission:

Results:
Here is the link for you to test it out for yourself (opens in new tab)! http://userfavorites.s3-website-us-west-2.amazonaws.com
Automate w/ AWS Lambda — Shutdown EC2 Instances Daily
Use Case:
Compute is typically a huge contributor to an AWS bill. Reducing compute by ensuring EC2 instances are shut down when not in use is very important. By running a script that shuts down EC2 instances daily, you can save significant money. In a production environment this could save you thousands of dollars. However, if used in production, consider using tags to control which instances are targeted for shutdown. Obviously, there are some instances that might legitimately need to run 24/7. This could also be used in a Sandbox Account provided to employees for testing and studying.
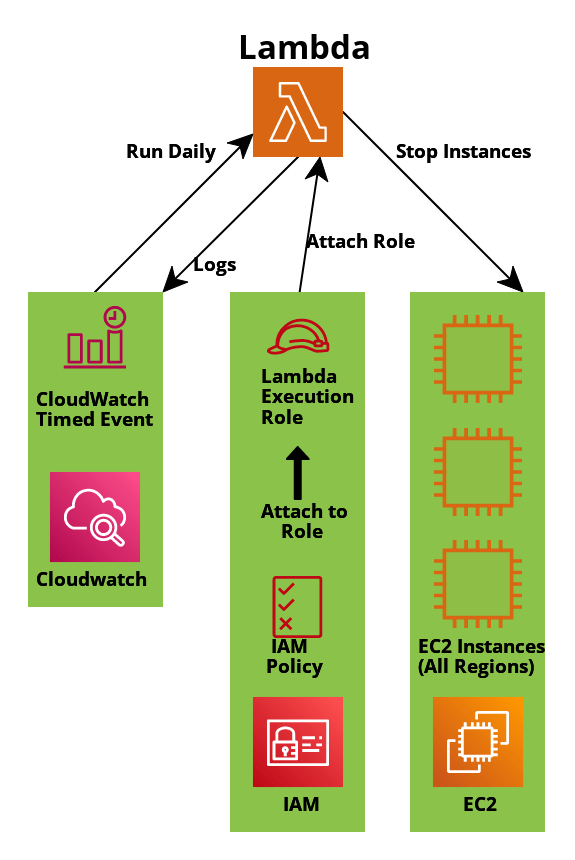
Architecture Diagram:
Overview:
- We will have a CloudWatch time-based event set to run each night at a specific time. This event will trigger the Lambda.
- The Lambda will perform the task configured in the Lambda function and write Logs back to CloudWatch.
Setup Process:
- Before you do anything, navigate to IAM. Click Policies -> Create Policy -> Change Policy Editor to JSON. Now paste the following:
{
    "Version": "2012-10-17",
    "Statement": [
      {
        "Effect": "Allow",
        "Action": [
          "logs:CreateLogGroup",
          "logs:CreateLogStream",
          "logs:PutLogEvents"
        ],
        "Resource": "arn:aws:logs:*:*:*"
      },
      {
        "Effect": "Allow",
        "Action": [
          "ec2:DescribeInstances",
          "ec2:DescribeRegions",
          "ec2:StartInstances",
          "ec2:StopInstances"
        ],
        "Resource": "*"
      }
    ]
  }
Click “Next”. Provide a name and click “Create Policy”.
- With the policy created, it’s time to attach the policy to a role. While still in the IAM service page, click Roles -> Create Role -> Choose AWS Service for Trusted Entity -> choose Lambda for the service -> click “Next”. Now search for the policy you just created and select it via a small checkmark box to the left of the name. Click “Next”. Give your role a descriptive name and click “Create Role”.
- Navigate to Lambda in AWS. Click “Create Function”, then choose “Author from Scratch”. Give the function a descriptive name and use any recent Python runtime. In this example I used 3.7.
- Click “Change default execution role”, “Use Existing Role”, then choose the role you just created. Click “Create Function”.
- Now open the Lambda function for editing. With the “Code” tab selected, you will likely see some boilerplate code there. Erase it, paste the following code, Save, and Deploy.
import boto3

def lambda_handler(event, context):

    # Get list of regions
    ec2_client = boto3.client('ec2')
    regions = [region['RegionName']
               for region in ec2_client.describe_regions()['Regions']]

    # Iterate over each region
    for region in regions:
        ec2 = boto3.resource('ec2', region_name=region)

        print("Region:", region)

        # Get only running instances
        instances = ec2.instances.filter(
            Filters=[{'Name': 'instance-state-name',
                      'Values': ['running']}])

        # Stop the instances
        for instance in instances:
            instance.stop()
            print('Stopped instance: ', instance.id)
Explanation of the code provided:
- Import boto3:
- This will be necessary because the boto3 library allows python to interact with AWS APIs. It is NOT necessary to create a Lambda Layer to upload this library, as it is built-into Lambda Functions.
- Def lambda_handler(event, context):
- This is mandatory for any lambda function. Event – contains information about how the Lambda was triggered. If an AWS service triggers the lambda, pertinent information will be included. For example, if an S3 event triggered lambda, the bucket name might be included. Context – this is used more for the performance and characteristics of lambda itself, such as how long to allow it to run before timing out, how much memory to use, etc. As you can see, it is not required to explicitly provide arguments for these parameters, but the parameters must be present where the function is defined.
- In the “get list of regions” section, we are using the EC2 client in boto3 to get a list of all of the regions in AWS. Then we call describe_regions inside of a list comprehension.
- In the “iterate over each region” section, now that we actually have a list of regions, we will use a For Loop to iterate through it and create an instance of the EC2 boto3 resource. We want to use resource here as opposed to client so we can operate at a higher level. Lastly, we use a print statement to print the name of the region. This will be seen in the CloudWatch Logs.
- In the “get only running instances” section, we use a filter to make sure we skip instances which are currently running.
- In the “stop the instances” section, we are using a For Loop to finally perform the action to stop EC2 Instance.
- The default timeout of Lambda is 3 seconds, and that won’t be enough. Click the “Configuration” tab, and under “General Configuration”, click “Edit” and set the timeout to 1 minute. Be sure to SAVE!
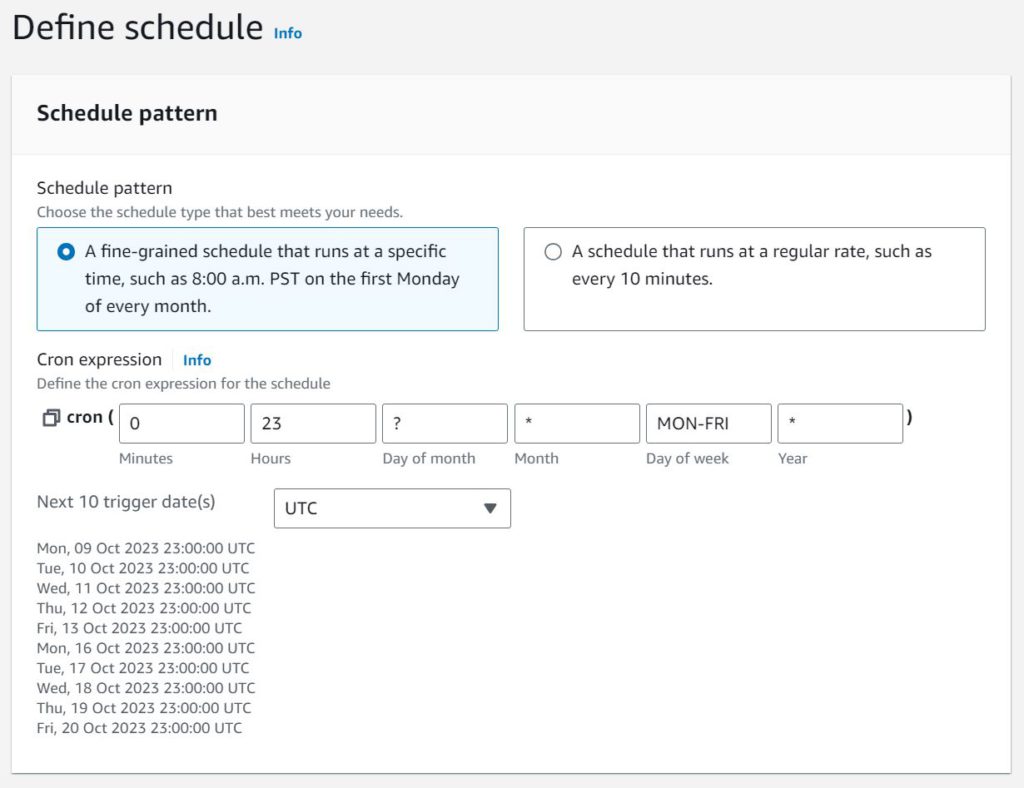
- While still viewing the Lambda Configuration, click the “Triggers” tab on the left -> Add Trigger -> Select Source: EventBridge -> Create New Rule -> Give a name -> Rule Type: Schedule Expression. For the Expression, use: “cron(0 23 ? * MON-FRI *)” without quotes. Click Add. Note: Be aware that the clock is based on UTC. You can toggle to show when it will trigger in local time, but you STILL have to give the UTC 24-clock trigger time. Also, if you are testing this on a weekend, change the days to MON-SUN.
- If everything was done correctly, you can test it by creating an EC2 instance in a couple regions and going back to the CRON expression and change it to a time of day which is very soon. If the running instances are shut off then congratulate yourself! If it doesn’t work, then troubleshoot 😀 We learn the most from our mistakes! Also, AWS UI and features change frequently, so there is always a chance this guide may be out of date!
Lastly, if you want to be a little more explicit with targets, you could use the below code to only stop instances which are running -and- have the matching tag (change key and value to whatever makes sense. Env:dev, dailyshutdown:true, whatever works.)
SSO Configuration for AWS (with JumpCloud IDP!)
AWS recommends using SSO and the use of assumed roles for user access to AWS. Traditional IAM accounts should be avoided when possible. Using roles allows you to avoid using long-term credentials, which is highly desirable. In this scenario, when the user attempts to access AWS resources, AWS SSO, or another component in the process, AWS STS (Security Token Service) is utilized to facilitate the “AssumeRole” operation. These tokens are temporary and short-lived.
We will also explore how to configure auto-provisioning with AWS Permissions Sets so that a user created in your IDP will be able to assume appropriate roles in AWS based on their IDP group membership, without having to configure AWS each time.
For this project, we will use JumpCloud as the IDP. JumpCloud happens to be perfect for tinkering with SSO, SCIM, and IAM concepts because it is free as long as you have 10 users or less (at least as of 10/14/23). This guide assumes you have already created a JumpCloud account. It is also assumed that you have an AWS account.
Please note that as a best practice, you should not configure SSO to log into the AWS Management account. It’s generally advised to set up AWS SSO and your IDP in a separate AWS account or AWS organization for several reasons:
- Security Isolation: By separating your identity management infrastructure (IDP) from your AWS Management account, you reduce the risk of potential security vulnerabilities. If the IDP and AWS Management account are in the same account and one is compromised, it could potentially lead to unauthorized access to your AWS resources.
- Least Privilege: The AWS Management account typically has broad administrative privileges. When you set up AWS SSO and your IDP in the same account, it may require unnecessary permissions that could be used to access or modify critical resources. Separating them allows you to apply the principle of least privilege more effectively.
- Administrative Separation: For proper access control and governance, it’s a good practice to separate the administration of identity and access management from AWS resource management. This separation can help ensure that identity and access decisions are made independently of resource decisions.
- Disaster Recovery and High Availability: Separating your IDP and AWS account provides more flexibility for disaster recovery and high availability scenarios. In case of issues with one account, you can rely on the other to maintain access and authentication services.
- Compliance and Audit: In many compliance and regulatory contexts, it’s a requirement to have separation of duties and administrative roles, which is easier to achieve when IDP and AWS accounts are distinct.
Now, onto the project!
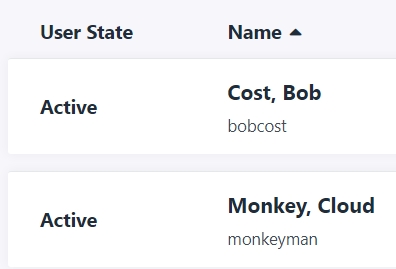
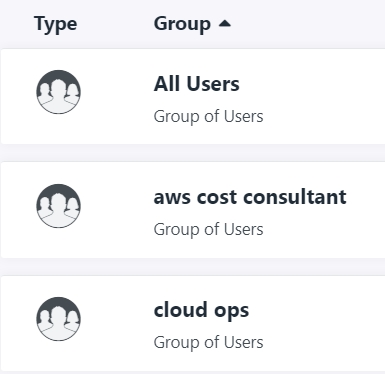
- Log into JumpCloud Admin Console. Let’s create a couple of users, so that we can test AWS Assume Role later. Name the users whatever you want. You do have to provide an email address for each user. At the time of writing, you do not have to click any link in the New User emails to activate them, but just in case, it’s probably a good idea to be able to actually receive the JC emails. I used Plus Addressing on my Gmail account. If your email address is cloudguy50@gmail.com, you can use cloudguy50+user1@gmail.com and the email will be delivered to your inbox still. You should also create a couple of groups so we can prove users are assuming different AWS roles depending on JumpCloud group. Below are my users and groups. Bob Cost will be assigned to the “aws cost consultant” group, and he would have access to AWS Cost Explorer and reports, but no access to other AWS Services like EC2. Cloud Monkey will be assigned to the “cloud ops” group, and will have much more permissions.
- Now that Users, Groups, and Group Membership is done, it’s time to start the Identity Provider (IDP) side of the SSO config. On the left side of the console, click SSO Applications -> Get Started (or create) -> AWS IAM Identity Center -> Next -> Provide a name such as “AWS SSO”. This is what will be displayed to users in the apps they have permission to use. Now click “Save Application”, and on the next page, click “Configure Application”. We will come back to this soon, but for now let’s set up AWS Organizations and create a member account. There is no cost to use AWS Organizations.
- Log into your AWS Management account. Go to AWS Organization from the Services menu. Click “Create an Organization” -> “Add an AWS Account” -> Name it “jumpcloud sandbox” and provide your email address for the account owner. Do not change the IAM Role Name. You may need to go to the email inbox associated with the Management account, in order to confirm the creation. Once finished, you should be able to see a new account within AWS Organizations.
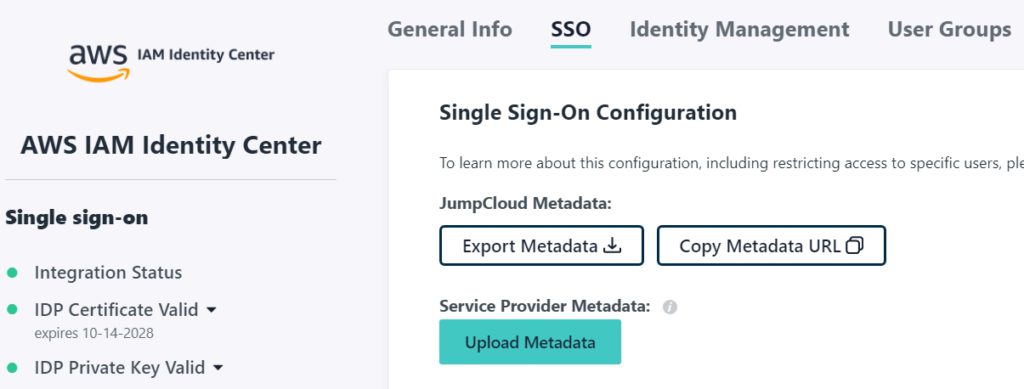
- Now that you have a member account in which so set up SSO, navigate to IAM Identity Center service while still logged into the Management account (you can only configure the IAM Identity Center from Management Account). Click “Enable” -> Choose Identity Source -> Actions: Change Identity Source -> External Identity Provider -> Next. Now you will see Service Provider (SP) metadata which is populated, and Identity Provider (IDP) metadata which is blank. The SP data will be entered into JumpCloud in the AWS SSO application, and JumpCloud will provide some metadata that we will return here to complete. The easiest way to enter the data is by downloading the SP metadata and uploading it on the IDP side, and download the IDP metadata to upload on the SP side. Click “Download Metadata File” within the SP section on this page.
- Back in the JumpCloud Admin Console, at the AWS SSO application configuration page, click the “SSO” tab. Now look for “Service Provider Metadata”, click the nearby Upload button, and choose the file you just downloaded from the AWS page. You also need to copy the “AWS access portal URL” from the AWS IAM Identity Center Dashboard into the text field in JumpCloud called “Login URL”. This should be unique to you, and something like “https://d-xxxxxxxxxx.awsapps.com/start”. Finally, on this same page, find “JumpCloud Metadata” and click the Export Data button to download the IDP metadata. Now SAVE and go back to the AWS page.
- Back at the AWS metadata page, in the section for IDP metadata, click “Choose File” button and select the file you just downloaded from JumpCloud, then click Next. AWS will show you a confirmation page with a lot of warnings. Read it carefully, type “ACCEPT” into the text field, then click Change Identity Source. You’ll be taken back to the IAM Identity Center Settings page.
- This is the point where you have to make a choice. Do you want to use SSO only, or SSO with Automatic Provisioning? If you only want to use SSO, you are going to have to configure users, groups, permissions sets manually in AWS. For the purpose of this project, we are going to use Automatic Provisioning. Find the option on this page and enable Automatic Provisioning. You will be shown a SCIM Endpoint value as well as Access Token. You will need to save these somewhere because you will never be able to access the token again. I recommend saving them as a Secure Note in a password manager. You can leave this information up for now.
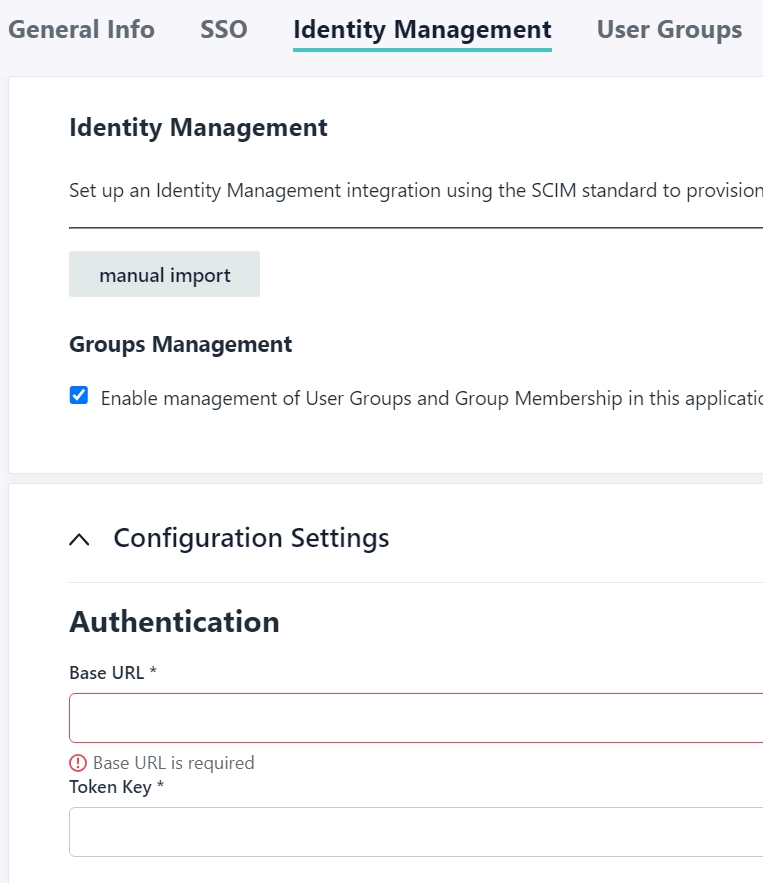
- Back at JumpCloud, Click on your AWS SSO application again to open the configuration page. Click the Identity Management tab, then under “Configuration Settings”, click Configure. For the Base URL, paste the AWS SCIM Endpoint value. For the Token Key, paste the Access Token value. Once you have pasted both values, click ACTIVATE first (you will see a pop-up in top-right saying Identity Management Data has been verified). Now don’t forget to SAVE!
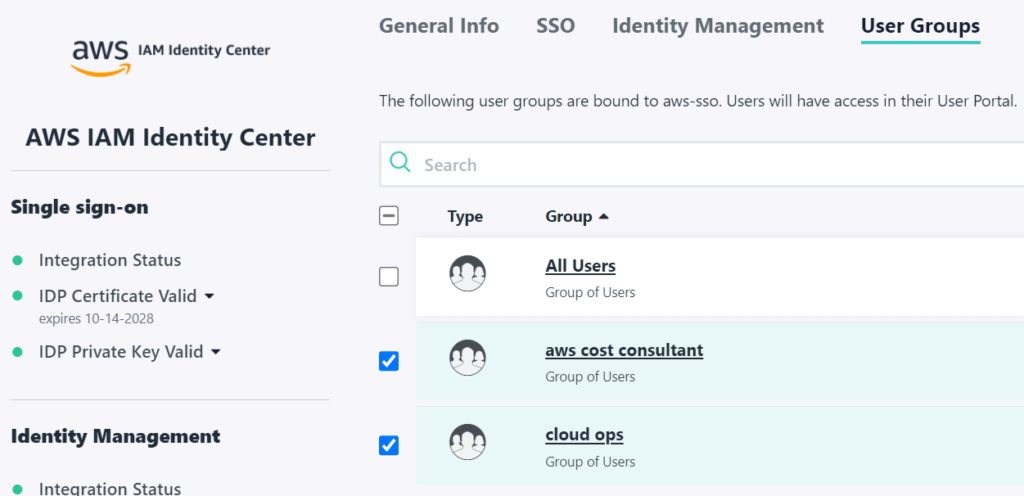
- At this point, all of the SSO and SCIM configuration is done. All that is left is assigning the SSO app in JumpCloud to the users and creating Permissions Sets in AWS to define exactly what resources each JumpCloud group can access in AWS. Before we do any of that, take a look at the Users tab on the AWS page. Wait a sec, didn’t we configure Automatic Provisioning? Why were the users not pushed to AWS? You may have guessed it – they won’t show up until the SSO App is assigned to them. Open the AWS SSO app in JumpCloud again, go to the User Groups tab, and check mark the groups that you want to be able to sign into AWS. Then SAVE. If you refresh AWS page now, you will see the users created.
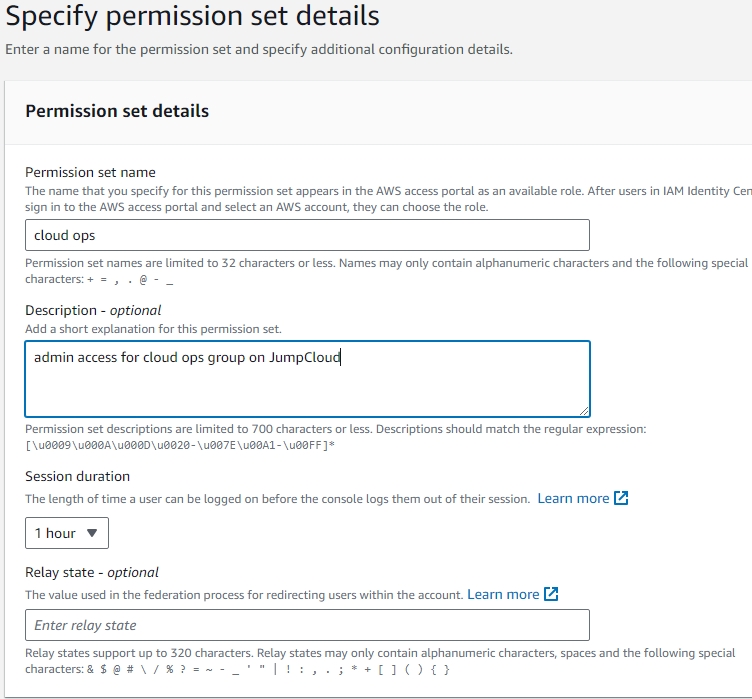
- On the AWS side, we need to assign AWS accounts to each group, and assign Permissions Sets. In this project, we will be providing BOTH user groups access to the member account, but in reality we could have created an entirely separate member account for segregation. Click “Permissions Sets” tab on the left, then “Create Permission Set”. Select Predefined Permission Set. We will give the Cloud Ops group AdministratorAccess and the “AWS cost consultant” group Billing (both managed AWS policies). In a work environment, you would need to use the principle of least privilege. Keep in mind that the name you give the Permission Set is what the user will see during login. Create both Permission Sets. Be sure to save.
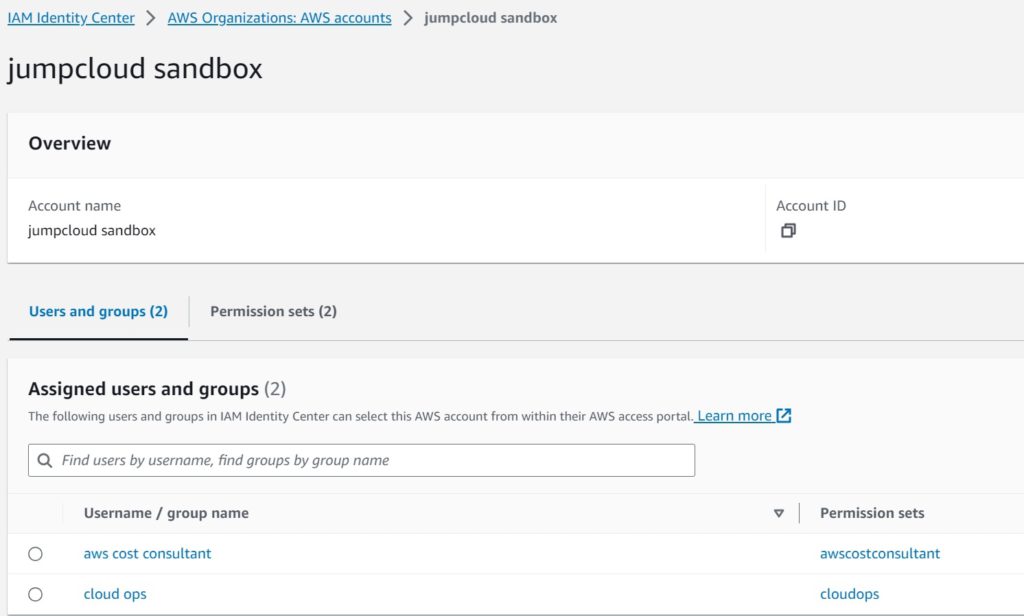
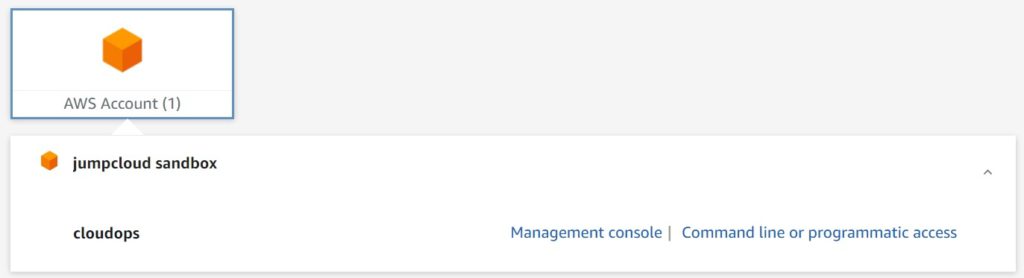
- With the Permission Sets created, now we need to associate AWS accounts with the User Groups. Click the “AWS Accounts” tab on the left. Check the box for your member account, then click “Assign Users or Groups”. On the next page, make sure you are on the Groups tab and check the boxes for ONLY ONE of your groups (you will need to repeat for each group, otherwise you will assign both permission sets to both groups). Click Next. Check the box for just one Permissions Set. Click Next. Click Submit. Before you move on, verify that the Groups only got their individual Permission Set and correct if needed. Click AWS Accounts tab on the left, and click on the Member account itself. You want to see something like this:
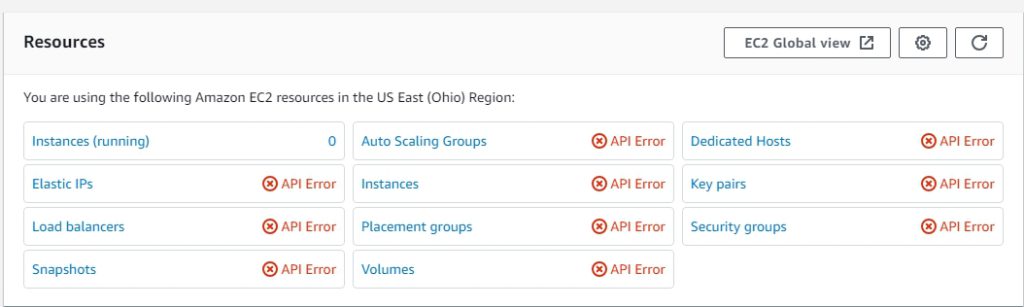
- Now it is time to test. Open a new Incognito or Private Browsing window and navigate to JumpCloud USER login page. Login as one of your users, and navigate to Applications tab, if not already there. Click on the badge for AWS SSO. In my first test I am logging in as the my AWS Cost Consultant, who should only have billing access. To test permissions, I go to EC2 service once logged in. Right away I get API Errors all over the page because I have no Read/List permissions within EC2 service. This is great!
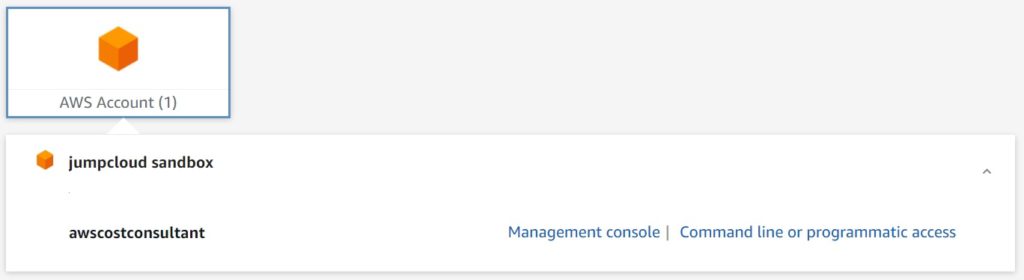
- Finally, let’s test with our Cloud Ops (Admin) user group. You will notice right away that the “awscostconsultant” role for the AWS account is not even available. We just have the cloud ops role we wanted. After logging in, we see the EC2 page just fine. This proves we correctly assigned permissions to both groups.

There is quite a bit of jumping back and forth between SP and IDP to set this up, but once it is done, managing users will be a whole lot easier. You can use customer-managed policies to finely control permissions, you have automatic provisioning setup so you can control everything mainly via JumpCloud IDP, and your users experience the bliss of Single Sign-On. The process for setting this up is very similar on other IDPs such as Okta, Google, etc.
So now that we’ve seen how to configure it, let’s dissect it and talk about what makes this possible.
Single Sign-On (SSO)
- Most of the readers here know what SSO is. You sign into one thing and that signs you into all the other things. But did you know that Single Sign-On technically refers to this functionality within the same domain/org? One example of SSO is Kerberos. Kerberos is -strictly- within enterprise LAN. As part of the authentication process with the authentication server, a user is granted a ticket through the ticket granting server. And then the user can use this ticket to authenticate to the rest of the systems on our network or in our enterprise.
Federation
- Means that an entirely different enterprise is trusting the assertion. In other words, two domains are involved. An example is when you log into a website where you never created an account, and you have the option to “Login with Google”. Take Slack for example. If you “Login with Google” to Slack, then Slack is trusting Google’s assertion that you authenticated already.
- A final example involves SSO + Federation together. For example I can set up Google Workspace as my identity provider. Now I have a user account in Google Workspace, and I configure SSO login for Slack and Zoom. Now when I log into my Google account, an assertion is created. The SSO config established a trust relationship with Google and Slack, and also with Google and Zoom. After logging into my Google account, I can use Slack and Zoom websites and services without being authenticated, because they trust Google. This is Federation + SSO.
Before we move on, let’s use a few more examples, because distinguishing SSO from Federation can be tricky at first. Since we are in the age of AI, let’s ask ChatGPT. Don’t worry, it isn’t hallucinating… I double-checked the response.
Prompt: Provide an example of SSO by itself (no federation). Next provide an example of Federation without SSO. Lastly, provide an example of Federation and SSO together.
Response: Single Sign-On (SSO) and Federation are often used together to provide a seamless and secure authentication experience, but they can also be used independently. Here are examples of each scenario:
- SSO (Single Sign-On) by itself:
- Example: In a large organization, employees use various applications and systems that require authentication, such as email, internal websites, and document management systems. Without SSO, each employee would need to log in separately to each of these systems, which can be time-consuming and frustrating. SSO implementation allows employees to log in once using a single set of credentials (username and password), and then access all the applications and services they are authorized to use without the need to log in again. This simplifies the user experience and improves security by reducing the risk of password-related issues.
- Federation without SSO:
- Example: Consider two universities collaborating on a research project. Each university has its own authentication system for its students and faculty. Without federation but with separate authentication systems, when a student or faculty member from one university needs to access resources at the other university, they would need to create a separate account and log in separately with different credentials. Federation in this context would involve setting up a trust relationship between the two universities’ systems, allowing users to use their home institution’s credentials to access resources at the partner institution. However, this doesn’t necessarily provide SSO. Users may still need to log in separately when they switch between the institutions’ systems.
- Federation and SSO together:
- Example: A large corporation uses a variety of cloud services for collaboration, file sharing, and communication. The company implements both SSO and federation to enhance security and user experience. Employees log in once using their corporate credentials through the SSO system. Once authenticated, they can access these cloud services without having to enter their credentials again. Additionally, when the company collaborates with external partners or vendors, federation is used to establish trust between the corporate identity provider and the partner’s identity provider. This allows employees and partners to seamlessly access shared resources with their respective organization’s credentials, creating a unified and secure authentication experience. The combination of SSO and federation ensures a streamlined and secure access process for both internal and external resources.
(Based on this information, it is clear that what we have achieved in this project is actually SSO + Federation.)
Security Assertion Markup Language (SAML)
- We used SAML in this project.
- Open standard framework for exchanging Authentication and Authorization between IDP (Identity Provider) and SP (Service Provider). Important to note, since it provides information about authorization, SP can make access-control decisions. So it tells the SP not only that the user is who they say they are, but provides information about the user that helps the SP decide what the user is authorized to do.
- XML based.
- Biggest use case is SSO FOR WEB APP. SAML is like Kerberos but used over the internet.
- There is much more to SAML when you look under the hood, but this guide is already very long, so if you want to dig deeper into SAML, please have a look at this documentation provided by oasis-open.org, which covers SAML as well as the XML elements that are used. https://www.oasis-open.org/committees/download.php/51890/SAML%20MD%20simplified%20overview.pdf
System for Cross-domain Identity Management (SCIM)
- In simple terms, SCIM is a standardized protocol used in the field of identity and access management to make it easier for organizations to manage user accounts and access privileges across different systems and services.
- The primary use case of SCIM is to streamline the process of managing user accounts and access privileges in a diverse IT environment. It simplifies user provisioning, de-provisioning, and access control. For example, when an employee joins a company, SCIM can automatically create their account in various systems, such as email, file storage, and internal applications. Likewise, when an employee leaves, SCIM can quickly disable or remove their access.
- User and Group Management: SCIM allows organizations to create, update, and delete user accounts and group memberships in a centralized manner.
- Protocol: It uses a simple HTTP-based protocol for communication between identity providers (like an organization’s user management system) and service providers (like cloud applications or systems that require user accounts).
- Schema: SCIM defines a common schema for user accounts and groups, ensuring consistent data representation across systems. This schema includes attributes like name, email, and group memberships.
- Endpoints: Identity providers expose SCIM endpoints that service providers can access to send and receive data. These endpoints allow for operations like user provisioning and de-provisioning.
If you made it this far, pat yourself on the back. Although the topics covered and technologies used in this project are common, and arguably basic, there is a lot to consider when you study it in greater detail. If you came just for the guide on setting up SSO to AWS, you should be able to follow very similar steps to achieve this with other IDPs. Keep in mind that JumpCloud and AWS may change their UI, menu options, etc. So it is very possible this guide could become out of date. I hope I was able to help!